Samstag, 17. September 2016


Donnerstag, 12. November 2015
Easy SBT build in Docker container
When you need to build your Scala project, but have no way to install SBT on your host, you can still do it if you have Docker.
There are few ready to use container images on DockerHub. We create our own.
All we need for that is to prepare a Dockerfile:
 FROM java:latest
 MAINTAINER Nikolay Kushin nikolay@indoo.rs
 ENV SCALA_VERSION 2.11.7
 ENV SBT_VERSION 0.13.9
 ENV SBT_OPTS -Xmx2G -XX:+UseConcMarkSweepGC -XX:+CMSClassUnloadingEnabled -Xss2M -Duser.timezone=GMT
 # install sbt
 RUN wget https://dl.bintray.com/sbt/debian/sbt-$SBT_VERSION.deb
 RUN dpkg -i sbt-$SBT_VERSION.deb
 # install scala
 RUN wget https://downloads.typesafe.com/scala/$SCALA_VERSION/scala-$SCALA_VERSION.deb
 RUN dpkg -i scala-$SCALA_VERSION.deb
 # fetch base dependencies
 RUN sbt compile
 VOLUME /src
 WORKDIR /src
 CMD ["sbt"]
Our Dockerfile is relatively easy and self-explaining.
Next step is to build an image. Save Dockerfile in some folder and execute following commande in terminal:
docker build -t sbt-docker .
Now when the image is ready we can create container with mounted source folder, containing our Scala project and run SBT.
docker run -it --rm -v $(pwd):/src sbt-docker sbt docker:stage
Thats it! Enjoy!
Samstag, 7. November 2015
RoboVM - way to write cross-platform mobile apps on Java
This weekend I spent some time participating in RoboVM Pull Request contest. Guys from RoboVM prepared demo application and invited people to add new features.

Amongst proposed features to add were:
Because I had almost no previous mobile development experience I decided to start with some simple thing.
Typical RoboVM mobile project consists from 3 modules:
For long time I wanted to give a try to Paypal Java SDK. That was a chance.
Because I wanted to use it for both platforms (iOS and Android) library dependency should be included to core module. Project uses Gradle as a build tool and all you need to do is include following line to build.gradle:
Android UI is organised in fragments. I added new one (PaymentDetailsFragment) and changed a bit logic of working with order placement.
That was a pleasure to work with new RoboVM Studio. Most of functions I used to have in JetBrais Idea I had as well because it is just fork of Community Edition.
If you are reading this text before 23rd November 2015 you still have a chance to win one of the prices provided for that RoboVM contest.

Amongst proposed features to add were:
- commercial transactions support
- localisation
- everything else you can imagine :)
Because I had almost no previous mobile development experience I decided to start with some simple thing.
Typical RoboVM mobile project consists from 3 modules:
- core - which shares code between platforms
- android - platform specific UI implementation for Android
- ios - platform specific UI implementation for iOS
For long time I wanted to give a try to Paypal Java SDK. That was a chance.
Because I wanted to use it for both platforms (iOS and Android) library dependency should be included to core module. Project uses Gradle as a build tool and all you need to do is include following line to build.gradle:
compile 'com.paypal.sdk:rest-api-sdk:1.2.9'At first I started with simple implementation of payment API (PaymentAPI). I following this reference. Tried following sample requests against my test account. Everything worked perfectly!
Android UI is organised in fragments. I added new one (PaymentDetailsFragment) and changed a bit logic of working with order placement.
That was a pleasure to work with new RoboVM Studio. Most of functions I used to have in JetBrais Idea I had as well because it is just fork of Community Edition.
If you are reading this text before 23rd November 2015 you still have a chance to win one of the prices provided for that RoboVM contest.
Mittwoch, 19. August 2015
Simple weather station on Arduino
To refresh some basic knowledge about electronics and Arduino platform we will implement a weather station.

Let's define requirements we'll have to out weather station. It should:

Let's define requirements we'll have to out weather station. It should:
- Display current temperature and humidity
- Display current time and date
- Set time and date manually using buttons
- Arduino-compatible microcontroller
- DHT11 temperature/humidity sensor
- Real-time clock module
- Small breadboard
- 2 small push buttons
- 2 1kOhm resistors
- Bunch of wires
- 5V DC power adapter
Freitag, 10. April 2015
Installing Scala and SBT on Ubuntu
Simply run following script to install latest Scala and SBT on your Ubuntu:
Mittwoch, 10. Dezember 2014
My participation in Global Hackathon
The past weekend I was lucky enough to participate in an event held by Koding (http://koding.com) titled "Global Hackathon" (https://koding.com/Hackathon).
Hackathon - is a kind of time-limited events, where participants work on projects for which in ordinary daily life there is no time as a rule. The main idea is to bring the idea to the finished prototype of the final product in the shortest possible time. Hackathon is named this way because participants can use all possible tools and ways to achieve this goal.
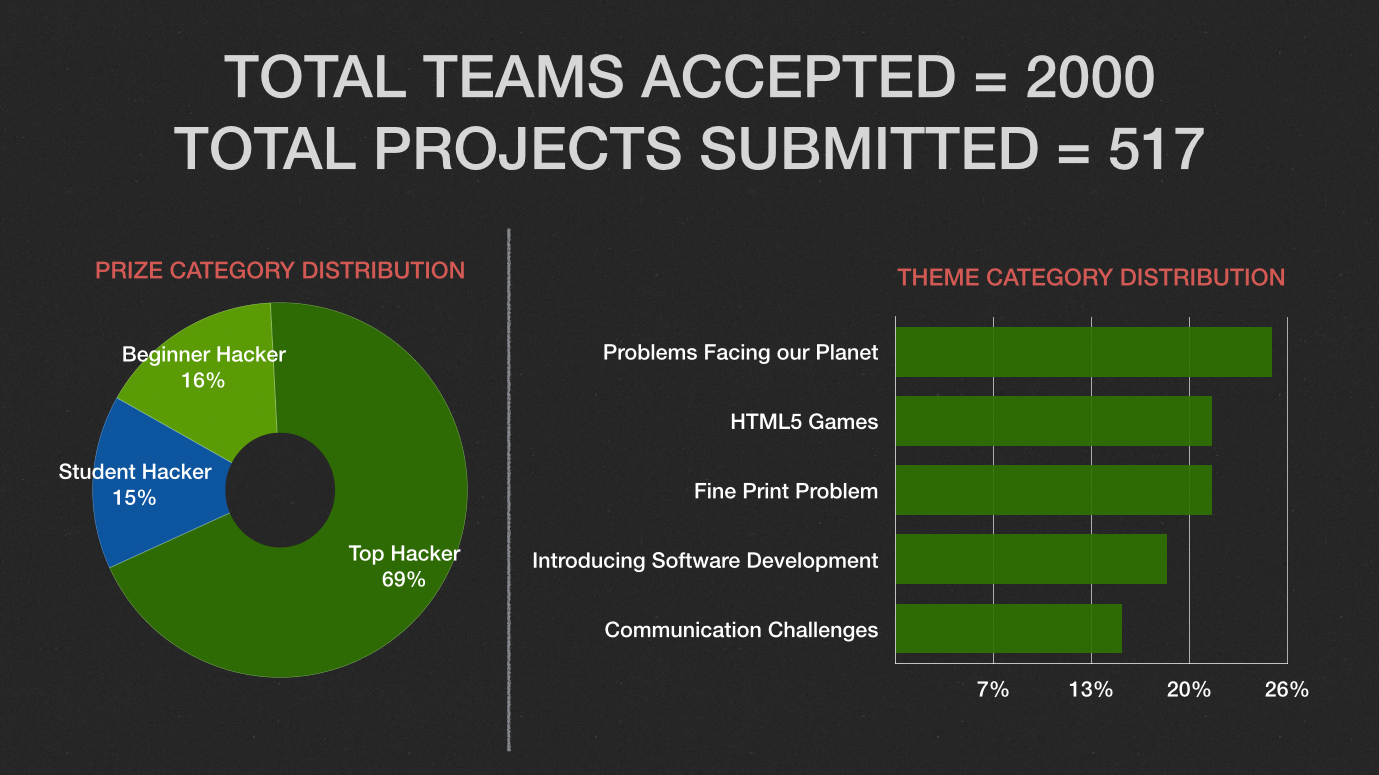 The event was attended by 2000 teams from all around the world, selected from more than 19,000 applications. Maximum number of participants in the team was equal to 5. Many people like me was not fortunate enough to find teammates and had to work alone. 51 of the judges will find winners among completed projects and the most worthy of them will be awarded.
Donnerstag, 29. Mai 2014
Arduino without IDE
 For my pet project I need to upload sketches to Arduino board connected to RaspPI. As usual I have only SSH access to PI and don't want to install a lot of unnecessary packages. So the only one thing you have to install it arduino-mk package:
 $ sudo apt-get install arduino-mk
Montag, 26. Mai 2014
RFID sensor (Funduino RFID-RC522)
 Recently I bought a set of Arduino-compatible components including RFID sensor (RC522).
After short search I've found good tutorial telling how to use this sensor, downloaded a library and connected sensor to my Arduino (be careful there is a typo in original blog post):
- MOSI: Pin 11
- MISO: Pin 12
- SCK: Pin 13
- SS: Pin 10
- RST: Pin 5
- GND: Gnd
- VCC: 3V3
Freitag, 9. Mai 2014
Connect RaspPI to WiFi
 Recently I've ordered two WiFi dongles for my Raspberry PI home project and today I received a parcel.
Prices:
2 x Wireless Adapter Network LAN Card 802.11n/g/b 2.4GHz - $3.41 / piece
Honestly said I had to investigate this topic before purchase, but in fact when I connected it to PI and set up wireless connection I was upset - it seemed not working.
Donnerstag, 1. Mai 2014
Ultrasonic Sensor: first try
 After few weeks waiting they finally came to me direct from China: my new Arduino Nano and a couple of ultrasonic sensors.
Price:
- 1 x Ultrasonic Module HC-SR04 Distance Measuring Transducer Sensor - $2.56 / piece
- 1 x Funduino Nano 3.0 controller - $7.89 / piece.
 First of all I connected VCC and GND pins to common rails and then to corresponding pins of ultrasonic sensor. After that I connected Trigger to Pin 3 and Echo to Pin 2 of Arduino board. As in many existing examples I decided to output signal through Piezo Buzzer. I simply connected Pin 4 of Arduino to positive leg of buzzer and the other leg to common ground.
Montag, 3. März 2014
API documentation for SBT project

- Add a line to your project/plugins.sbt file
addSbtPlugin("org.planet42" % "laika-sbt" % "0.5.0")
- These lines to build.sbt
import laika.sbt.LaikaSbtPlugin.{LaikaPlugin, LaikaKeys}
import LaikaKeys._
LaikaPlugin.defaults - If you want to redefine default settings
sourceDirectories in Laika := Seq(new java.io.File("app/docs"))
includeAPI in Laika := true - Build documentation by executing following command from SBT console
laika:site
Change Jenkins default port on Mac
If you want to run Jenkins locally on Mac OS X and change default port 8080 you have to change httpPost parameter using following command:
After that you have to restart Jenkins:sudo defaults write /Library/Preferences/org.jenkins-ci.plist httpPort 9000
Thats it.sudo launchctl unload /Library/LaunchDaemons/org.jenkins-ci.plist
sudo launchctl load /Library/LaunchDaemons/org.jenkins-ci.plist
Sonntag, 5. Januar 2014
CloudControl - setup Scala/Play application
 CloudControl (https://www.cloudcontrol.com) is a Platform as a Service solution.
You can deploy on it Java NodeJS PHP Python Ruby applications as well as a lot of Third-Party Buildpacks including Scala/Play (https://github.com/heroku/heroku-buildpack-play). Its main particularity is that it supports vertical and horizontal scaling.
The following guide explains how to deploy your application on CloudControl.
Sonntag, 15. Dezember 2013
Life after Coderetreat 2013
 Last Saturday I was on Coderetreat 2013 in Vienna. There we tried to implement rules of Conway's Game of Life. During the day I've got a lot of experience in TDD, pair programming and languages I haven't used for a while. One thing I've missed was final implementation of game.
One day after the event I've tried some ideas I'd got before. I've pushed my own implementation of game in my Github repository and created an instance of server on Heroku.
Montag, 9. Dezember 2013
RPI: extending swap
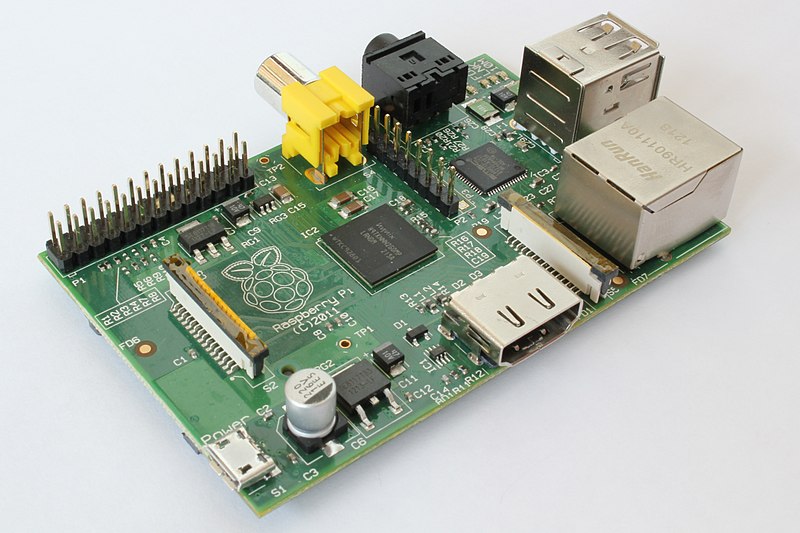 Last weekend I spent some time running my Scala/Play application on Raspberry PI. I got an OutOfMemoryError and had to slightly extend swap space:
 >sudo su
>echo "CONF_SWAPSIZE=512" > /etc/dphys-swapfile
>dphys-swapfile setup
>dphys-swapfile swapon
Sonntag, 24. November 2013
Quotes from Coffeescript Application Development book
Above I posted some extractions from the book Coffeescript Application Development I found the most interesting.
 Classes
Variable arguments listMost of the time, you will define your methods in the main body of the class definition. This is the easiest and most logical place. However, there are a few occasions when you may wish to attach a method to an object prototype from somewhere else in the code. This may be for stylistic or metaprogramming reasons, or most likely, to attach methods to an object that you did not define. CoffeeScript provides the :: operator for easy access to an object's prototype.
Appending ... to an argument name in the function definition tells CoffeeScript to accept any number of arguments. That variable will be assigned an array containing all the relevant values that were passed.Check on existence
CoffeeScript has a helpful existential operator to deal with these situations correctly and cleanly. It is a simple ? symbol.Destructuring assignments
We can even use destructuring assignment to perform in-place variable swaps:Loops return array of results
[first, second] = ["cow", "milk"]
# Wait, or is it the other way around?
[first, second] = [second, first]
console.log "Don't put the #{second} before the #{first}."
Destructuring assignment can be used with more complicated structures too:
[drink, [alcohol, mixer]] = ["Screwdriver", ["vodka", "orange juice"]]
console.log "A #{drink} consists of #{alcohol} and #{mixer}."
One extremely useful feature of CoffeeScript loops is that they return a value—an array of the results of the inner statement for every item in the loop. If you've ever used Array.prototype.map to transform an array, you'll be happy to see that it's easy to achieve the same functionality in CoffeeScript.Link on book in store
Review of CoffeScript Application Development book
 CoffeeScript Application Development, the book I read lately, helped me to take overall look at the language I have recently used on a number of projects. Like many books about programming languages it is also divided into chapters which follow you from the very beginning — tools installation and basic syntax to more advanced topics like classes and asynchronous operations. The book also covers such things as debugging, using the language for server-side development and adopting it for usage with different JS-frameworks.
Each topic of a book goes with a number of examples clearly showing how to use specific CoffeeScript features and what code will look like after compilation into JavaScript. The only thing I found ineffective is a way how author presented the example application. Its progress was mixed within the material treatment. For me as a person who read a book without immediate trying and following examples by hand it has been difficult to get a sense of this examples. I would rather move this example application into separate appendix and make cross-links on related topics. Thus the material treatment could be more consistent and at the same time the example application could be more readable and perceptive.
I would definitely recommend this book for reading people who find annoying such things in JS as checking curly braces parenthesis, frequently testing variables on existence and maintaining code written using different code conventions.
After reading I have got obvious feeling that CoffeeScript makes code much clearer and understandable allowing to explain things in a very concise way in comparison with bare JavaScript and as the result it makes code better maintainable. As soon as ease of maintainability is one of the corner stones of software development in modern realities the profit from usage CoffeeScript excessively covers spending time on its learning and getting on usage.
Freitag, 13. September 2013
Yet another stack plugin for Flotchart
For my own project I need a plugin which can display at the same time stacked bars with the positive and negative values and usual line stacked charts with positive values.
There are two plugins which can do it:

There are two plugins which can do it:
- Stack plugin from Flot distribution
- Stack Positive Negative Bars by ericliao
Each of these plugins does a part of job. The first one can display line and bar charts only with positive values. The socone does not work with line charts.
That was the reason why I decided to write yet another plugin for Flot.

Feel free to use and contribute.
P.S.: I have an ide to update it to show stacked line diagrams with negative values also, but not sure that user can interpret it correctly :)
Montag, 26. August 2013
Nginx, remote_addr and Tomcat in reverse proxy configuration
Many people use Nginx as reverse proxy and their applications may depend on remote_addr request variable. The following steps help to correct it.
First of all check if Nginx contains necessary module be executing the command:
You should see this line in the output:
Then you need to add following lines to your Nginx configuration:
And at the end add this to your Tomcat server.xml
How to configure valve you may read here. Do not forget to replace 111.111.111.111 with your server IP.
Good luck!
First of all check if Nginx contains necessary module be executing the command:
nginx -V
You should see this line in the output:
--with-http_realip_module
Then you need to add following lines to your Nginx configuration:
set_real_ip_from   111.111.111.111;
real_ip_header    X-Real-IP;
real_ip_recursive on;
And at the end add this to your Tomcat server.xml
 <Valve
   className="org.apache.catalina.valves.RemoteIpValve"
   internalProxies="111\.111\.111\.111"
   remoteIpHeader="x-forwarded-for"
   remoteIpProxiesHeader="x-forwarded-by"
   protocolHeader="x-forwarded-proto"
   />
How to configure valve you may read here. Do not forget to replace 111.111.111.111 with your server IP.
Good luck!
Dienstag, 23. Juli 2013
Ember.js plus Bootstrap Datetimepicker
If you need to use Bootstrap Datepicker component in your Ember.js application the code shown below will help you.
- First of all you have to create new View object:
- And then insert it into your template:
App.DatePickerView = Ember.TextField.extend
 _valueChanged: Em.observer 'value', ->
  value = moment(@get('value'), 'DD.MM.YYYY HH:mm')
  @$().data("DateTimePicker").setDate(value)
  return
 didInsertElement: ->
  @$().datetimepicker
   format: 'DD.MM.YYYY HH:mm'
  return
{{view App.DateField value=mydate}}
Abonnieren
Posts (Atom)